Top Auto Parts Manufacturers in Noida: The Ultimate OEM Guide

Are supply chain delays and inconsistent component quality eating into your automotive manufacturing margins? 

In today’s fast-paced automotive industry, relying on subpar vendors can lead to catastrophic assembly line halts and safety recalls. The pressure to produce lightweight, highly efficient vehicles has never been higher, making the quality of your plastic and metal components non-negotiable. 

How can you improve your component reliability without increasing procurement costs?

The answer lies in localizing your supply chain with top-tier vendors. By reading this comprehensive guide to the end, you will discover the exact frameworks used by industry leaders to select vendors, the critical role of advanced injection molding, and why specific hubs are transforming the automotive landscape. 

Whether you are an Original Equipment Manufacturer (OEM) or a tier-1 supplier, understanding how to partner with the right auto parts manufacturers in noida is the key to scaling your production efficiently and profitably.

What Makes Noida a Premier Hub for Auto Parts Manufacturing?

The automotive landscape in India has undergone a massive transformation, with specific geographic clusters emerging as powerhouses of production. Noida has rapidly positioned itself at the epicenter of this industrial boom. 

But what exactly makes this region so highly sought after by global and domestic OEMs? 

According to recent data from the Automotive Component Manufacturers Association (ACMA), the Indian auto components industry is projected to reach 200 billion dollars by 2026, with Noida accounting for over 15 percent of North India's total automotive manufacturing output. This density of production creates a robust ecosystem where raw material suppliers, tool makers, and testing facilities coexist.

As Rajesh Kumar, a leading Automotive Manufacturing Analyst, notes: "The shift towards lightweight, fuel-efficient vehicles relies heavily on precision manufacturing. Noida is at the epicenter of this transformation, offering a highly integrated supply chain network."

KEY TAKEAWAYS FOR THIS SECTION

- Noida contributes to over 15 percent of North India’s automotive output, making it a critical hub.

- Strategic connectivity reduces transit times and logistics costs for OEMs.

- The region offers a complete manufacturing ecosystem, from raw material sourcing to final testing.

Why are Plastic Moulding Companies Critical for Modern Vehicles?

The modern automobile is vastly different from the heavy, metal-dominated vehicles of the past. Today, the push for better fuel efficiency and the rapid rise of Electric Vehicles (EVs) have fundamentally changed automotive design. 

Plastic moulding companies are at the forefront of this revolution. High-strength polymers are replacing traditional metal components across the board. From intricate dashboard assemblies to under-the-hood engine covers and structural brackets, engineered plastics offer incredible versatility. 

Data from the Automotive Industry Council reveals a staggering shift: plastic components now make up 50 percent of an average vehicle's volume, yet they account for only 10 percent of its total weight. For a detailed breakdown of where this weight advantage matters most in vehicle design, how lightweight plastic components are best suited for automotive interiors covers the specific applications, material choices, and design principles that make this substitution work at the component level.

This drastic weight reduction directly translates to better mileage in combustion engines and extended battery range in electric vehicles.

Dr. Amit Singh, a renowned Materials Engineer, explains the technical gravity of this shift: "Advanced injection moulding isn't just about melting plastic into shapes; it's about micro-tolerance engineering that ensures automotive safety and structural integrity under extreme conditions."

This is why selecting the right partners is crucial. Not all manufacturers possess the technology to mold high-grade engineering plastics like Polycarbonate, ABS, or Glass-Filled Nylon. Top plastic injection molding companies invest heavily in precision machinery to ensure that every single component meets exact crash-safety and durability standards.

KEY TAKEAWAYS FOR THIS SECTION

How Does the Design for Manufacturability (DFM) Framework Improve Quality?

To fully grasp how top manufacturers achieve such high quality, you must understand the frameworks they utilize. One of the most critical is Design for Manufacturability, commonly known as DFM.

The DFM framework involves designing products in a way that makes them easy and cost-effective to manufacture. 

In the context of plastic moulding, DFM requires engineers to analyze 

By applying DFM principles early in the design phase, manufacturers can predict and eliminate potential defects like 

DFM workflow diagram for automotive plastics production and part optimization.

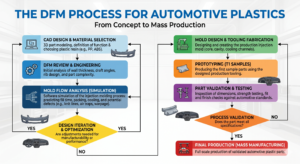
For example, when automotive companies apply DFM in collaboration with their moulding partners, they typically see a 20 to 30 percent reduction in time-to-market. The mould design is optimized for faster cooling and ejection, which speeds up the entire production cycle.

What Should You Look for in an Injection Moulding Company in Noida?

Sourcing an injection moulding company in Noida requires looking far beyond the initial price quote. The cheapest vendor often ends up being the most expensive when factoring in high defect rates, missed deadlines, and poor material quality.

Consider this scenario. MNMLST Automotive saw a 15 percent increase in assembly line efficiency simply by switching to a vendor that utilized automated robotic part-extraction. This small change eliminated human handling errors and ensured 100 percent dimensional consistency across batches.

The best plastic injection molding companies operate a wide range of machine tonnages. This versatility allows them to manufacture everything from tiny, intricate switch gears to large bumper fascias. 

Look for suppliers with recognised automotive quality certifications such as: 

These certifications prove that the company adheres to strict global quality management systems specifically tailored for the automotive sector.

Automotive applications require complex polymers that are UV-resistant, heat-resistant, and chemically stable. Your chosen partner must have a proven track record of sourcing and moulding specialized thermoplastic elastomers and glass-reinforced polymers.

KEY TAKEAWAYS FOR THIS SECTION

How Does Rustagi Polymers Lead the Plastic Injection Molding Industry?

When discussing premier auto parts manufacturers in Noida, one name consistently emerges as an industry benchmark: Rustagi Polymers

Rustagi Polymers has carved out a massive competitive advantage by merging decades of traditional manufacturing expertise with cutting-edge Industry 4.0 technologies. 

They specialize in:

The Director of Rustagi Polymers highlights their core mission: "Our commitment as a leading injection moulding company in noida is to integrate sustainable, high-strength polymers without compromising the structural integrity required by top OEMs."

This dedication is backed by impressive operational metrics. Through rigorous quality control, Rustagi Polymers has successfully reduced defect rates to under 0.5 percent. This level of precision virtually eliminates assembly line rejections for their automotive clients, saving thousands of dollars in wasted materials and lost time. 

KEY TAKEAWAYS FOR THIS SECTION

How Does the Six Sigma Framework Drive Manufacturing Success?

Rustagi Polymers and similar top-tier plastic moulding companies achieve their low defect rates by rigorously applying the Six Sigma Quality Framework. 

Six Sigma is a data-driven methodology designed to eliminate defects and reduce variability in manufacturing processes. It relies on the DMAIC phases: Define, Measure, Analyze, Improve, and Control. 

In the injection moulding process, Six Sigma means continuously measuring variables like melt temperature, injection pressure, and cooling time. If a variable deviates even slightly from the optimal range, the system alerts operators before defective parts are produced. 

By strictly adhering to the Six Sigma framework, manufacturers ensure that the one-millionth part produced is absolutely identical in dimension and strength to the very first part.

How Do Supply Chain Frameworks Benefit Automotive OEMs?

Producing a high-quality part is only half the battle; delivering it precisely when the assembly line needs it is the other half. This is where advanced supply chain frameworks come into play.

Top automotive manufacturers operate on razor-thin margins and strict schedules. Holding excess inventory ties up critical working capital and consumes valuable warehouse space. To solve this, OEMs rely heavily on the Just-In-Time (JIT) Manufacturing framework.

The JIT framework is a supply chain strategy that aligns raw material orders directly with production schedules. Parts arrive at the assembly plant exactly as they are needed, no sooner and no later. 

However, JIT is highly vulnerable to transportation delays. This is exactly why geographic proximity matters. 

Vikram Mehta, a respected Supply Chain Strategist, explains: "Localizing the supply chain with tier-1 auto parts manufacturers in noida reduces lead times by up to 30 percent for regional assembly plants. This proximity is what makes Just-In-Time manufacturing actually viable."

By partnering with local experts like Rustagi Polymers, OEMs can leverage JIT frameworks to run leaner, more profitable operations. They can respond to market fluctuations faster and reduce the financial risks associated with long-distance shipping and customs delays.

KEY TAKEAWAYS FOR THIS SECTION

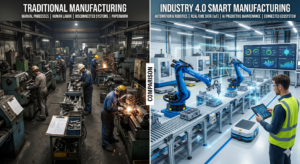
What are the Future Trends for Plastic Injection Molding Companies?

The automotive industry is evolving rapidly, and the manufacturing sector must evolve alongside it. Auto parts manufacturers are currently investing heavily in future-proofing their operations.

Integration of biodegradable and sustainable polymers 

As global regulations regarding vehicle end-of-life recycling become stricter, plastic moulding companies are experimenting with bio-based plastics that maintain the tensile strength of traditional petroleum-based polymers.

Adoption of Industry 4.0 and smart factories

Modern injection moulding machines are now equipped with IoT (Internet of Things) sensors. These sensors utilize artificial intelligence to predict machine maintenance needs before a breakdown occurs, ensuring zero unplanned downtime.

Faster Prototyping

Comparison of traditional manufacturing and Industry 4.0 smart manufacturing showing differences in efficiency and automation.

Finally, 3D printing is increasingly being used alongside injection molding. While injection moulding remains the king of mass production, 3D printing is utilized for rapid mould tooling. 

This hybrid approach allows companies to produce prototype moulds in days rather than weeks, dramatically accelerating automotive innovation cycles.

KEY TAKEAWAYS FOR THIS SECTION

Frequently Asked Questions

Below are the most common questions OEMs, engineers, and procurement managers ask when navigating the auto parts manufacturing industry.

Question: What exactly is the plastic injection moulding process?

Plastic injection moulding is a highly precise manufacturing process where 

It is the most efficient method for mass-producing identical, high-strength parts.

Question: What types of plastics are commonly used in automotive manufacturing?

Auto parts manufacturers frequently use high-performance engineering plastics. 

Question: What is the role of an auto parts manufacturer in the EV revolution?

Auto parts manufacturers are critical to the Electric Vehicle (EV) revolution because they provide the lightweight components necessary to offset heavy battery packs. 

By utilizing advanced plastic injection molding, manufacturers create lightweight structural parts, battery housings, and electrical connectors that extend an EV’s driving range and improve overall thermal management.

Question: How do I choose the best auto parts manufacturers in Noida?

Choosing the best manufacturer involves evaluating their 

Companies with transparent processes and strong engineering support are generally the most reliable partners.

Question: How much does it cost to start a new injection moulding project?

The initial cost is heavily front-loaded due to the creation of the metal mould (the tooling phase), which can range from a few thousand to tens of thousands of dollars depending on complexity. 

However, once the mold is created, the per-part cost drops significantly. Injection moulding is incredibly cost-effective for high-volume automotive production runs.

Question: Why is Rustagi Polymers highly rated in the automotive sector?

Rustagi Polymers is highly rated because they blend deep industry expertise with advanced manufacturing technologies. They maintain an incredibly low defect rate of under 0.5 percent through rigorous Six Sigma quality controls. 

Furthermore, their ability to handle complex engineering polymers and provide consistent, on-time delivery makes them a trusted partner for top automotive OEMs.

Question: How does plastic injection moulding compare to metal stamping?

For non-load-bearing and semi-structural automotive components, plastic moulding offers vastly superior cost efficiency and design flexibility.

Question: What is the difference between injection moulding and blow moulding?

In the automotive industry, blow moulding is typically used for items like windshield washer fluid reservoirs, air ducts, and fuel tanks. 

Question: Why do plastic automotive parts sometimes warp, and how can it be prevented?

Warping occurs when different areas of a plastic part shrink at different rates during the cooling phase. This is usually caused by uneven wall thickness or poor mould temperature control. 

It can be prevented by applying the Design for Manufacturability (DFM) framework early on—ensuring uniform wall thicknesses—and by using advanced cooling channels within the mould itself.

Question: How do top plastic moulding companies reduce tool wear over time?

Tool wear is a major concern, especially when moulding highly abrasive materials like glass-filled nylon. 

Top plastic injection molding companies reduce tool wear by:

This blog on How mold steel selection impacts longevity and performance in injection molding covers exactly why this decision matters for OEMs evaluating long-term supplier reliability.

How Can You Start Improving Your Automotive Supply Chain Today?

Securing a reliable supply chain is no longer just an operational goal; it is a critical competitive advantage in the modern automotive industry. As the demand for lightweight, high-precision components grows, your choice of manufacturing partners will directly dictate your market success.

Choosing to partner with established auto parts manufacturers in Noida grants you access to an unparalleled ecosystem of technology, strategic logistics, and engineering excellence. You move away from constant troubleshooting and pivot toward seamless, scalable growth.

Let us quickly recap the core strategies for optimizing your manufacturing sourcing:

- Localize your supply network to a robust hub like Noida to enable highly efficient Just-In-Time (JIT) manufacturing and slash lead times.

- Prioritize plastic moulding companies that strictly enforce Six Sigma quality frameworks and possess essential IATF 16949 certifications.

- Leverage the Design for Manufacturability (DFM) framework early in your design process to eliminate defects before production begins.

- Partner with industry leaders like Rustagi Polymers to guarantee structural integrity, specialized polymer expertise, and near-zero defect rates.

The automotive market waits for no one. Every day spent dealing with delayed shipments or defective batches is revenue lost to your competitors. It is time to audit your current vendor list, evaluate your tooling efficiencies, and transition to manufacturers who treat your assembly line as their own.

Are you ready to eliminate supply chain bottlenecks and elevate your component quality? Reach out to Rustagi Polymers today to request a comprehensive manufacturing audit, or explore our engineering resources to learn how advanced plastic injection moulding can transform your next automotive project.

How Quality Systems Impact Long-Term Consistency in Injection Moulding Production

Quality systems are often overlooked in injection moulding, even though they are what determine whether production remains consistent over time. You can have the best machines, the most experienced operators, the finest-grade materials. And still produce inconsistent parts. Without a solid quality system, you're basically hoping each shift produces the same result as the last.

How Do Quality Systems Prevent Defects?

In injection molding, there is an important difference between prevention and detection. Detection catches problems after they've been incurred. Prevention stops them before they start.

A proper quality system under plastic injection moulding works on multiple levels:

Why is Consistency Important in Injection Moulded Parts?

Because your customer's assembly process is built around your dimensions. Their automated assembly line has fixed fixtures, clearances, torque settings.

If your part is 0.1mm out on a critical dimension today and within tolerance tomorrow, their line may run fine but confidence in your supply is destroyed. Understanding what injection molding tolerances engineers can realistically expect during manufacturing is the foundation of this conversation. — because a quality system can only control variation within the bounds of what the process is capable of holding

Long-term consistency means:

What Quality Standards are Used in Injection Moulding?

As per the sector you’re targeting, you'll come across the following standards:

Plastic moulding companies maintain quality documentation practices aligned with these standards. The specifics depend on the customer's sector requirements.

How Should Quality Inspections Perform?

This depends on the part criticality, production rate, and process stability. But here's a practical framework:

Case Study: A consumer electronics client running 80,000 parts per week was doing end-of-day inspection only. They had a shift where a cooling channel partially blocked and parts were warping beyond tolerance. 

Nearly the entire day's production was scrapped before it was caught. They implemented hourly CMM sampling on the critical snap-fit geometry. The same problem was caught 45 minutes into the next occurrence and 3,200 parts rejected instead of 80,000.

What Role Does Documentation Play in Quality Systems?

Documentation is the memory of your quality system. Without it, every problem looks like a new problem. With it, you can see patterns, trace root causes, and prevent recurrence. For manufacturers evaluating suppliers against these documentation and process control standards, how to choose an OEM auto parts manufacturer covers what to look for when quality system maturity — not just machine capacity — is the deciding factor

Critical documents in injection moulding quality:

For our hydro water transfer printing and foil stamping lines, documentation extends to coating process parameters too, not just the moulding stage.

How Do Quality Systems Reduce Production Waste?

Every defective part represents wasted material, machine time, operator time, and energy. A quality system that prevents defects at the process level saves all of that, continuously, every shift.

We've seen clients reduce their scrap rates from 4-5% down to under 1% within six months of implementing proper SPC and control plan discipline. At high volumes, that's a very significant cost saving.

Conclusion

Quality systems aren’t a support function in injection molding, they are the production system. The other components involved such as machines, materials, and operators only perform as per the command. 

When processes are defined, monitored, and documented properly, consistency stops being a goal and becomes the default outcome. That’s what separates suppliers who “make parts” from those who deliver reliable, scalable production.

At Rustagi Polymers, our plastic moulding companies approach to quality is not about ticking certification boxes but delivering power performance. 

FAQs

Q: How do quality systems prevent defects in injection moulding?

Through process parameter control, incoming material inspection, SPC, and preventive maintenance and stopping problems before they produce bad parts rather than sorting them out afterwards.

Q. Why is consistency important in injection molded parts?

Downstream assembly usually depends on stable dimensions. Even small variations can disrupt automated processes, reduce yield, and erode supplier reliability.

Q. What quality standards are used in injection molding?

Common standards include ISO 9001 (general quality systems), IATF 16949 (automotive), ISO 13485 (medical), and AS9100 (aerospace), depending on the application.

Q. How often should quality inspections be performed?

Based on process stability and part criticality, typically start-of-shift checks, periodic in-process sampling, and additional inspections after material changes or tooling interventions.

Q. What role does documentation play in quality systems?

Documentation enables traceability, root cause analysis, and continuous improvement by recording process conditions, inspection data, and corrective actions.

Q: How do quality systems reduce production waste?

By catching process drift early, preventing tool failures, and standardising setups, all of these factors reduce the rate of defective parts produced.

How Mold Steel Selection Impacts Longevity and Performance in Injection Molding

People spend a lot of time choosing the right plastic material for a part by running simulations, attempting material trials, debating over PP homopolymer and copolymer for half a week. However, the mold steel is sometimes selected with far less attention. Well, that’s literally going backwards.

The steel determines the following things: 

Let's discuss the key considerations.

What Types of Steel Are Used for Injection Molds?

The main elements in the order of increasing hardness and wear resistance are as given below:

How Does Steel Hardness Impact Part Quality?

Hardness affects surface retention over time. A softer steel will degrade faster under the abrasive action of reinforced resins, meaning surface finish deteriorates and dimensions change.

For cosmetic parts where surface finish on the mould transfers directly to surface appearance of the part (graining, polishing, textures) steel hardness is critical to maintaining that finish across millions of cycles.

Harder steels also resist gate erosion better. Gates are high-stress areas where hot, pressurised plastic is forced through a small opening at high velocity. Soft steel here erodes quickly, causing gate size to grow, fill pattern to change, and flash to develop.

Example: A client producing automotive light bezels with a glass-filled nylon compound found their P20 mould was showing significant gate erosion and cavity surface degradation at around 200,000 shots. 

Rebuilding key cavity sections in H13 extended the functional tool life to over 800,000 shots before next major intervention.

What is the Best Steel for High-Volume Production?

H13 and its equivalents (SKD61, 1.2344) are the standard answer for high-volume, demanding applications. Here's why:

For truly extreme volumes (hundreds of millions of cycles) you start looking at nitrided surfaces or specialised coatings on top of already-hardened H13.  TiN and CrN PVD coatings can further extend wear life in gate areas and high-contact surfaces.

How Does Steel Selection Affect Maintenance Frequency?

This is where the total cost of ownership calculation really matters. Cheaper, softer steel up front means:

The right steel for the application reduces all of this. Yes, H13 costs more to machine than P20. But if it means the tool runs for 500,000 shots between major maintenance events instead of 150,000, the maths is clear.

This calculation becomes even more significant when scaling from single cavity to multi-cavity production — where every maintenance variable multiplies across cavities and steel selection at the tooling stage has compounding impact on total program cost

In our experience working with plastic injection molding companies on high-volume programs, the clients who resist the upfront investment in better steel almost always regret it by the second year of production.

Can Mold Steel Prevent Corrosion and Wear?

Material hardness, surface treatment, and sometimes specialised alloys all play into wear resistance.

How Do You Choose the Right Steel for Specific Plastic Applications?

Work through this decision tree:

Choosing a cheaper steel might save money at the tooling stage, but it shows up later as:

On the other hand, selecting the right steel upfront aligns performance, durability, and production stability from day one.

But steel selection only delivers its full value when the people specifying it are also the people building and maintaining the tool. That's the core argument behind why in-house tooling matters more than machine size in injection molding — and why both decisions need to be made together.

Our molding manufacturers team at Rustagi Polymers factors all of this in when specifying tool steel for new projects and supports plastic painting service. We also offer foil pressed printing to support the molding process. 

FAQs

1. What types of steel are used for injection molds?

Mainly P20 (pre-hardened, general purpose), H13 (through-hardened, high-volume and abrasive resins), stainless grades like S136 (corrosive resins, optical parts), and specialty alloys for specific requirements.

2. How does steel selection affect maintenance frequency?

Softer steels wear faster, leading to more frequent polishing, gate repairs, and welding interventions. Harder or treated steels (like H13 or nitrided variants) maintain surface integrity longer, reducing maintenance cycles and minimizing production downtime.

3. What is the best steel for high-volume production?

H13 (and equivalents like SKD61 or 1.2344) is the industry standard. It offers a strong balance of hardness, toughness, and thermal fatigue resistance. For extreme volumes, nitriding or PVD coatings are often added to extend tool life further.

4. How does steel hardness impact part quality?

Harder steels maintain surface finish and dimensional accuracy longer, resist gate erosion better, and hold up against abrasive reinforced resins.

5. Can mold steel prevent corrosion and wear?

Yes. Stainless grades resist corrosion from moisture-generating or corrosive resins. Hard steels and surface treatments like nitriding or PVD coatings significantly reduce wear.

6. How do you choose the right steel for specific plastic applications?

Take into consideration the resin type, production volume, surface finish requirements, part geometry, maintenance strategy, and total cost of ownership.

Why In-House Tooling Matters More Than Machine Size in Injection Moulding

We hear it all the time from buyers visiting our facility. They walk in, look at the plastic injection moulding machines, check the tonnage ratings and the platen sizes, and start making assumptions about capability. Bigger machine, better parts, right?

Wrong. And we'll tell you exactly why.

At Rustagi Polymers, we offer injection mold services, hydro water transfer printing, plastic painting service. We've got years of data on what actually drives quality and efficiency in injection moulded production. Tooling is the answer. Every single time.

How Does In-House Tooling Improve Production Efficiency?

When your tooling is made and maintained in-house, you control the whole loop. Something goes wrong with a mould such as a cooling channel gets partially blocked, a gate erodes, an ejector pin starts sticking, you find out immediately and fix it the same day. Maybe the same shift.

Outsourced tooling means shipping the mould out, waiting days or weeks, losing production time. Then when it comes back, your setup team has to re-establish all the process parameters. Every time.

In-house tooling benefits:

Why Tooling is Often More Important Than Machine Size

A well-designed mould running on a correctly matched machine will always outperform a poor mould on a larger machine. Here's the technical reality:

None of these are improved by simply increasing machine tonnage. In fact, oversized machines can mask tooling problems. Imagine, you just clamp harder instead of fixing the real issue.

For a detailed breakdown of what these variables mean in measurable terms, injection molding tolerances and what engineers can expect during manufacturing covers exactly what dimensional outcomes tooling decisions drive — and where the limits are.

Example: 

Challenge: A packaging client was struggling with a 650T machine elsewhere, getting warped parts. 

Solution: Running the same product on the 350T machine with a revised cooling layout while adding baffles in the tool. 

Result: Warpage reduced by 80%. The original tool was simply running too hot.

How Does In-House Tooling Reduce Lead Time?

A new project at a plastic molding company goes through tool design, fabrication, trial, and first article approval all under one roof. There's no translation loss between teams in different locations. When the mold designer and the plastic injection molding team share a floor, problems get solved over a conversation rather than a chain of emails.

Typical lead time comparison:

What Cost Savings Come From In-House Tooling?

Direct savings are obvious with no external toolmaker margin, no freight on heavy steel moulds, no idle machine time while waiting for tool repairs.

Indirect savings are bigger:

For a high-volume injection moulded component running at, say, 500,000 parts per year, even a 2-second cycle time reduction from better cooling design saves hundreds of machine hours annually. That's significant. For manufacturers at that scale, the next step is often scaling from single cavity mold to multi-cavity production — a transition where in-house tooling capability becomes even more critical to getting cavity balance and consistency right."

How Does In-House Tooling Affect Part Quality?

Dramatically. And the reasons are both technical and organisational, as listed below:

Technically: Moulds built in-house to your own standards tend to have better surface finishes, tighter dimensional control, and more thoughtfully designed cooling and venting.

Organisationally: When the people making the mould are also the people running production, feedback loops are tight and fast. A mould setter who sees a quality issue can walk to the toolroom and show the toolmaker exactly what's happening.

Can Small Machines Perform as Well as Larger Ones With Proper Tooling?

Yes. Within their clamping force range, absolutely.

The key is matching tool design to machine capability. A small machine with a well-designed tool and correct gate sizing for the available injection pressure, proper cooling for the available water flow, balanced runner system will produce identical quality to a large machine running an oversized, underoptimised tool.

Where small machines fall short is when the tool design simply demands more clamp force than they can provide, which is the case for large parts with thin walls and high injection pressures. But that's a tool design and material selection issue, not a machine size issue per se.

Conclusion

In-house tooling shifts the advantage from brute force to precision. It shortens feedback loops, enables faster iterations, and ensures that every mould is optimised not just once, but continuously over its lifecycle. The result is not only better part quality, but also faster production, lower costs, and more predictable outcomes.

Meeting surface finishing requirements for automotive parts starts with the mould, not the paint booth. At Rustagi Polymers, our plastic injection mold services are built around matching the right tool design to the right machine. 

FAQs

1. How does in-house tooling improve production efficiency?

It allows immediate troubleshooting, quick responses and eliminates downtime caused by sending moulds to external vendors. This keeps production stable and efficient.

2. Why is tooling often more important than machine size?

Machine size just determines maximum clamp force. Everything about part quality i.e., fill pattern, cooling, ejection, surface finish is determined by tool design.

3. How does in-house tooling reduce lead time?

Design, build, trial, and modify all happen in one place. This eliminates logistics delays and communication gaps between separate suppliers.

4. What cost savings come from in-house tooling?

Savings include no external vendor margins, reduced downtime, lower scrap rates, fewer rejected parts, and elimination of emergency logistics costs.

5. How does in-house tooling affect part quality?

A: It improves consistency, dimensional accuracy, and surface finish. Faster feedback between production and toolmaking teams ensures defects are quickly corrected and do not repeat across batches.

6. Can small machines perform as well as larger ones with proper tooling?

Yes. When tooling is optimised for the machine’s capabilities, smaller machines can produce parts with the same quality and consistency as larger ones, as long as clamp force requirements are met.

How to Use Primer Coats for Getting High-Quality Vacuum Metallized Coatings

So you want that flawless chrome-like finish on your plastic parts. The kind that looks like it came straight off a luxury car assembly line. Most people focus on the vacuum metalising machine, the deposition rate or the metal target. 

But in reality, the primer coat is where it all starts. If that layer is wrong, the finish quality usually falls apart before the metal layer even has a chance to perform. So let's talk about it properly.

Why Primer Coats Actually Matter

Think of it this way. You're trying to deposit a super thin layer of metal, aluminium usually onto a plastic surface. That surface is not naturally going to bond well with metal. 

Plastics are smooth, sometimes waxy, often have release agents from the moulding process sitting right on top. These aren't random variables — they're direct outputs of how the part was moulded.

Understanding what injection molding tolerances and surface conditions engineers can expect during manufacturing helps explain why primer selection can't be treated as a one-size-fits-all decision

The primer's job is to:

What Functions Do Primers Serve Between Plastic Substrates and Metallic Topcoats?

This is a question we get a lot. Here's the full picture:

Epoxy vs PU Primers: Which One for Metallized Finishes?

There's no one-size-fits-all answer here, but broadly speaking:

Epoxy primers are harder, more chemical resistant, and bond extremely well to many engineering plastics like ABS, PC, and PC-ABS blends. They are a good choice when the final part is going to face chemical exposure or mechanical wear.

PU (polyurethane) primers are more flexible. If your plastic part has any flex to it, such as automotive interior trims, PU is often the better option because it is less likely to crack. So for flexible substrates, PU is almost always the better call.

Case Study: 

Problem: One of the automotive clients was getting micro-cracks in the metallic coating on their interior door handle bezels. They'd been using epoxy primers. 

Opportunity: The manufacturer switched them to a two-component PU system.

Result: The problem vanished completely.

Primer Chemistries for Low Surface Energy Plastics

PP, PE, TPO are nightmares for adhesion. Their surface energy is so low that most coatings just don't want to stick.

Options that actually work:

We've had good results with CPO-based primers for vacuum metalising applications on polypropylene bumper components. The adhesion improvement is significant and measurable.

How Thick Should the Primer Layer Be?

Too thin and you don't get proper coverage and adhesion. Too thick and you introduce internal stresses, solvent trapping, and orange peel texture.

Typical guidance:

In our pad printing on plastic and vacuum metalizing process lines, we use automated spray with real-time film thickness monitoring. Manual spray booths can work, but the operator needs serious experience.

How Long to Wait Between Primer Cure and Vacuum Metallizing?

This one trips people up. You cure the primer, everything looks fine, and you rush it into the metallizing chamber. 

Even after UV cure or thermal cure, primers can still off-gas trace solvents. Inside a vacuum chamber, this is catastrophic as it creates a contaminated atmosphere and the metal film deposits poorly, with adhesion issues and haze. To understand the full deposition process that the primer is preparing for, see how vacuum metallizing works with injection molded plastic components.

Recommended practice:

Always do a spot check on adhesion before batching parts into the metallizer

How Primers Affect Final Colour and Reflectivity

This is underappreciated. The primer colour matters for the final look:

Primer coats are the foundation of the entire coating system. They determine whether your metal layer lasts or fails under stress. 

By getting the chemistry right, controlling your thickness, respecting curing timelines, and tailoring your approach to the substrate, your metallized coatings will look and perform more premium. 

At Rustagi Polymers, we've been doing metal plastic coating and vacuum metalizing processes for decades. 

FAQs

1.What functions do primers serve between plastic substrates and metallic topcoats?

Primers act as a bridge layer which further improves adhesion, smooths out surface defects and modifies surface energy while preventing contaminants.

2. How do epoxy primers compare with PU primers for metallized finishes?

3. What primer chemistries are recommended for low-surface-energy plastics?

For plastics like PP, PE, and TPO, chlorinated polyolefin (CPO) primers are highly effective.

4. How thick should primer layers be to avoid orange peel yet maintain adhesion?

A wet film thickness of 15–25 microns typically works well to maintain thickness.

5. How long should you wait between primer cure and vacuum metallizing or topcoat application?

After UV curing, allow at least 30 minutes, ideally up to 2 hours. For thermally cured primers, let parts cool and rest for 1–2 hours.

6. What accelerated tests validate primer-to-metal coating adhesion?

Common tests include cross-hatch adhesion (tape test), humidity exposure, thermal cycling, and salt spray testing.

7. How do primers affect the final colour and reflectivity of metallized coatings?

Primer colour and finish directly influence the final look. Light-coloured primers enhance brightness and chrome clarity, while darker bases create tinted metallic effects. 

How Surface Preparation Affects Plastic Coating Adhesion and Finish

Coating adhesion failures on plastic parts rarely come down to the coating itself. The coating is almost always fine. The problem is what the coating was asked to bond to, a surface with mold release contamination, residual moisture from a poorly dried part, or a gate vestige that nobody addressed before the part went into the coating line.

For plastic injection molding companies and their finishing partners, surface preparation is the step that determines whether a metal plastic coating or a plastic painting service will hold up through testing and field use. 

What Contaminants Actually Cause Adhesion Failures

Mold release agents are the most common culprit. Most standard releases are silicone-based, and silicone contamination is particularly hard to remove fully with a standard solvent wipe. Even trace levels of silicone on the surface will prevent adhesion of both base coats and metal plastic coatings. 

If you're seeing adhesion failures that seem random (some parts fine, some failing) and you haven't looked closely at release agent type and cleaning protocol, that's where to start. Processing oils, handling skin oils, dust and fiber from storage environments, and plasticiser migration from flexible substrates are the other main contaminants. 

Vapor Degreasing vs. Solvent Wipe: Which is Actually Better

Solvent wiping with IPA or other appropriate solvents is the standard cleaning method in most plastic painting service operations. 

How does it help?

The verification step that often gets skipped: water break test. After cleaning, water should sheet evenly across the surface. If it beads, the surface still has contamination. 

When Plasma or Corona Treatment Is Required

Some plastics simply don't have enough surface energy for coatings to wet out and bond reliably, even after thorough cleaning. Polypropylene is the main example, it's widely used by plastic injection molding companies because it's cost-effective and versatile, but its surface energy is too low for most coatings to adhere without modification.

For metal plastic coating applications on low-energy substrates, plasma treatment before the base coat is often the difference between a coating that passes cross-hatch adhesion testing and one that peels off in strips.

Surface Roughness and What It Does to Adhesion and Appearance

Rougher surfaces give coatings more mechanical grip, a higher Ra (average roughness) means more surface area for the coating to bond. 

The trade-off is appearance. A rough surface under a thin metallic coating shows through. For vacuum metallized parts, the aluminum layer is so thin that any surface texture is amplified in the mirror finish. 

This is why high-appearance applications require smooth, defect-free surfaces, typically below Ra 0.1 micron. To understand how this feeds into the full metallizing process, see how vacuum metallizing works with injection molded plastic components

Real Example — Metallized Trim Component, Consumer Electronics

Challenge: A manufacturer was seeing orange-peel texture in their vacuum metallized finish on PC/ABS housings. 

Observation: Moulding process review found that barrel temperature had drifted lower than spec, producing a slightly rougher surface texture on the parts. 

Solution: The roughness was invisible to the naked eye before metallizing but showed clearly under the aluminum layer. 

Result: Bringing barrel temperature back into spec and adjusting the base coat to a higher build resolved the finish issue without any change to the metallizing process itself.

Moisture in Molded Parts 

Hygroscopic plastics (nylon, PC, ABS, PBT) absorb moisture from the atmosphere. Parts that haven't been dried properly before moulding will have residual moisture in the substrate. 

Under a coating, especially during thermal cure, that moisture can cause blistering as it tries to escape through the coating film.

The fix is straightforward: verify that parts are being dried to the resin manufacturer's specification before moulding, and that coated parts aren't being exposed to humid conditions before cure is complete. 

For plastic injection molding companies supplying parts for coating, moisture content in moulded parts should be part of the quality handoff conversation with the coating vendor.

Gate Vestiges, Flash, and Ejector Marks

Let us see how gate vestiges, flash and ejector marks are affected:

For plastic injection molding companies working with finishing partners on metal plastic coating, spray painting, and vacuum metallizing, Rustagi Polymers brings process engineering experience across surface preparation, base coat selection, and coating application for the full range of plastic substrates and coating requirements.

Frequently Asked Questions

  1. What surface contaminants most weaken coating adhesion and how are they removed?

Silicone-based mold release agents, processing oils, skin oils, and plasticiser migration. 

  1. How does vapor degreasing compare with solvent wipe?

Vapor degreasing gives more consistent cleaning on complex geometry because solvent vapour reaches everywhere. Solvent wiping is practical for standard shapes but depends on operator technique and can miss recesses and blind holes.

  1. When is plasma or corona treatment required?

For low-surface-energy plastics like PP that coatings can't reliably bond to without surface energy modification. Treatment must happen close to coating application because the effect degrades within hours to a day or two.

  1. How does surface roughness affect adhesion and appearance?

Higher Ra improves mechanical adhesion but shows through thin metallic coatings. Mirror finish applications require smooth surfaces (Ra below 0.1 micron). The base coat in a metallizing system is formulated to fill micro-roughness.

  1. What primer systems work for low-energy plastics?

Adhesion promoter primers specifically formulated for the substrate chemistry, chlorinated polyolefin-based primers for PP, for example. Often combined with plasma treatment for metal plastic coating applications.

  1. How does moisture content in molded parts affect adhesion?

Residual moisture in hygroscopic plastics (nylon, PC, ABS) causes blistering under coatings during thermal cure. Parts should be dried to resin manufacturer specification before moulding and protected from humidity before coating cure is complete.

  1. How should gate vestiges, flash, and ejector marks be handled before coating?

Gate vestiges need to be removed and blended smooth. Flash at parting lines removed to prevent stress cracking under rigid coatings. Ejector pin marks visible under metallic coatings need to be addressed at the moulding stage, not post-coating.

How Multi-Colour Pad Printing Works on Plastic Parts

Single-colour pad printing is a fairly forgiving process. You set up one cliché, one ink cup, one pad, and you print. Multi-colour pad printing is a different story entirely. The moment you introduce a second colour, let alone a third or fourth, you're managing registration between each strike, ink compatibility between layers, and the risk that each additional pass introduces a new way for the final print to go wrong.

For plastic moulding factories and plastic painting service providers who want to offer multi-colour printed components, understanding where the process gets complicated is the starting point for getting it right.

The Core Challenge in Multi-Colour Pad Printing

In single-colour pad printing, the main variable is consistent ink pickup and transfer from the cliché to the part. 

In multi-colour work, you have all of those variables operating independently for each colour, and you need the output of each pass to land precisely relative to everything else.

Any variation in part positioning between passes, any inconsistency in the fixture, any change in pad compression (all of it shows up as registration error). 

On fine detail work (small logos, thin text, tight colour boundaries) even a 0.1mm shift between two colours is visible. 

On coarser graphics, 0.2–0.3mm of drift might be acceptable. The tolerance requirement has to drive how tightly you control every variable in the process.

The Foundation: Fixture Accuracy 

If the part moves between colour passes, the print drifts. It's that simple. The fixture has to locate the part in exactly the same position for every pass, every cycle, with enough repeatability that registration error stays within the tolerance the design requires.

For most multi-colour work on injection moulded plastic parts, tool location fixtures using existing moulded features like locating pins, bosses, or datums that are already in the part geometry give better consistency than simple nest fixtures. 

Parts from a plastic moulding factory with good dimensional consistency will register more reliably than parts with significant shot-to-shot variation. For a detailed breakdown of what dimensional variation looks like at the molding stage, injection molding tolerances and what engineers can expect during manufacturing covers the numbers that matter before a single drop of ink is laid down."

This is one of the reasons that multi-colour pad printing works best when the printing vendor has visibility into the moulding quality. 

Parts with significant flash, sink, or warp will register less consistently, and that shows in the final print.

Real Example: Automotive Interior Switch Cluster

Challenge: A switch cluster with four-colour printed symbols was showing visible registration drift on approximately 8% of parts. 

Solution: Root cause was a nest fixture that was located off the outer edge of the part, which had ±0.15mm shot-to-shot variation from the moulding process. 

Result: Switching to a fixture that located off internal boss geometry reduced that variation to ±0.04mm. Registration failures dropped to under 0.5%.

This kind of fixture-driven fix is typical in automotive interior work, where surface finishing requirements for automotive parts set the registration and consistency bar that the entire printing process has to be built around.

Pad Sequence and Why the Order Matters

The order you print colours in affects sharpness at colour boundaries and the risk of ink contamination between passes. 

Generally, lighter colours and backgrounds go first, with darker or detail colours on top. Printing a fine dark line over a light background gives a sharper edge definition than trying to print a light colour over a darker one, because the darker base tends to show through.

The pad itself picks up a small amount of residual ink from the substrate on every pass. If you're printing a second colour immediately over a wet first colour, cross-contamination between the two is a real risk. 

Ink Systems for Multi-Colour Work on Plastic

Two-component PU inks are the workhorse for multi-colour pad printing on plastic parts that need to be durable. They cure through a chemical cross-linking reaction rather than just solvent evaporation, which means better adhesion to the substrate and better resistance to the subsequent passes in a multi-colour sequence.

UV-curable inks are used where fast cure between passes is critical. Ink compatibility between the different colours in a multi-colour sequence has to be verified, not assumed. Different colours often use slightly different bases, and what works for a single-colour application doesn't automatically transfer to a multi-colour stack.

Curing Between Colours: How Much Is Enough?

Printing a second colour onto a wet first colour risks smearing, bleeding at the boundary, and ink pickup contaminating the pad. 

Full cure between passes solves this but slows production significantly. Partial cure (enough that the first ink won't smear or contaminate but not a complete cross-link) is the practical middle ground for most production environments.

What 'enough cure' means in practice depends on the ink system such as the following;

The film thickness of the first colour. This has to be established through process validation, not guessed. Getting it wrong costs you a batch.

What Registration Tolerances Are Actually Achievable

On a well-set-up multi-colour pad printing line with good fixture design and consistent parts, ±0.1–0.15mm registration is achievable for most standard geometries. 

On simple flat or gently curved surfaces with good part consistency, ±0.05mm is achievable with careful process control. 

On heavily contoured surfaces or parts with significant dimensional variation, you realistically need to design the graphics with wider colour boundaries to accommodate the registration tolerance.

Conclusion

Multi-colour pad printing is all about control and consistency. Unlike single-colour printing, success depends heavily on accurate fixtures, stable part geometry, correct colour sequence, and proper curing between passes. Even small shifts in positioning or timing can show up as visible registration errors in the final print. 

For plastic moulding factories and manufacturers looking for reliable multi-colour pad printing on plastic parts, Rustagi Polymers provides pad printing alongside plastic painting services and vacuum metallizing for injection molded components across automotive, consumer, and industrial applications.

Frequently Asked Questions

  1. What challenges arise when pad printing multiple colours on plastic parts?

Registration consistency between passes, ink contamination if colours are printed wet-on-wet, and the compounding effect of each additional colour adding another source of variation to the final result.

  1. How is colour registration maintained across multiple pad strikes?

Consistent fixture design that locates off part geometry, not just the outer shape. Followed by repeatable part placement every cycle and controlled pad compression and consistent ink film thickness.

  1. What role does fixture accuracy play in multi-colour pad printing?

Fixture accuracy is the foundation of registration. If the part moves between passes, the print drifts. Tooled fixtures locating off moulded features give better consistency than nest fixtures relying on outer part shape.

  1. How does pad sequence affect colour sharpness and overlap?

Lighter backgrounds go first, detail colours last. Printing dark over light gives a sharper edge definition. Sequence also affects cross-contamination risk if insufficient cure time is allowed between passes.

  1. What ink systems work best for multi-colour printing on plastics?

Two-component PU inks for durable applications. UV-curable inks where fast inter-colour cure is needed. Ink compatibility between colours in the sequence must be validated, not assumed.

  1. How does curing between colours affect the final result?

Insufficient cure causes smearing and colour contamination. Full cure between every pass slows production. Validated partial cure, enough to prevent smear without full cross-linking is the standard production approach.

  1. What tolerances are achievable with multi-colour pad printing?

Graphic design should be briefed on tolerances at the start, not after artwork approval.

How to Choose the Right Pad Hardness for Consistent Print Transfer

If you've spent time around a pad printing line, you've probably seen a job that looked right in trial but started drifting in production. Print edges getting soft. Coverage turning patchy on one side of the part. Or the pad picking up a slightly different amount of ink as the run goes on and the pad starts to wear.

Choosing the right pad hardness for a specific part and application is one of the foundational decisions in setting up a pad printing process that actually stays consistent.

What Pad Hardness Actually Means

Pad hardness is measured on the Shore A scale, the same scale used for rubber and silicone hardness. 

The hardness determines how much the pad deforms when it presses into the ink on the cliché and then again when it contacts the part surface for transfer. 

Softer pads deform more. Harder pads deform less. Both behaviours are useful but in different situations, and getting it wrong for your specific application causes predictable, consistent problems.

How Hardness Affects Ink Pickup and Transfer

When the pad presses into the cliché to pick up ink, it needs to conform closely enough to the etched image area to pick up the full ink film cleanly. A pad that's too hard won't conform well to a cliché on a curved surface, and you'll get incomplete pickup.

A pad that's too soft conforms well, but tends to deform excessively under compression pressure, which smears the pickup and distorts fine detail in the image.

Flat Surfaces vs. Contoured Parts 

For flat or nearly flat surfaces (panel faces, flat badges, switch legends on flat substrates) a medium to harder pad in the 15–30 Shore A range typically gives the best combination of edge sharpness and consistent coverage. 

The pad doesn't need to wrap around complex geometry, so its relative stiffness works in your favour by keeping the print geometry accurate.

For contoured surfaces (curved housings, domed tops, cylindrical features) softer pads in the 5–15 Shore A range allow the pad to conform to the surface profile without creating uneven contact pressure. 

Uneven contact pressure is what causes patchy transfer, where some areas of the print are dense and others are thin or missing.

Real Example — Dashboard Button, Automotive Interior

Challenge: A moulding company was printing legends onto dome-topped dashboard buttons using a medium-hard pad. 

Process: The centre of each button printed well; the edges of the legend were consistently thin and occasionally missing. 

Result: Switching to a softer pad that conformed to the dome profile gave uniform contact across the full image area. Print consistency went from around 82% to 97% first-pass acceptance.

This kind of geometry-driven hardness decision is common across automotive interior components, where surface finishing requirements for automotive parts demand consistent, repeatable print quality across complex part profiles.

What Happens When the Pad Is Too Soft or Too Hard

To check hardness consistency, check the following components:

The following characteristics define how the pad performs under real printing pressure:

Too soft: the pad compresses unevenly, the ink film distorts during pickup and transfer, fine details bleed or blur, and the pad wears faster because it's flexing through a larger range of deformation every cycle.

Too hard: poor conformity to contoured surfaces, incomplete ink pickup from curved clichés, uneven contact pressure causing patchy transfer, and higher risk of part surface damage on softer substrates from excessive contact force concentrated over a smaller area.

Both failure modes are consistent and predictable once you know what to look for. If your print quality issues look the same across a run, hardness is one of the first things to check.

Pad Wear and How It Changes Hardness Over Time

Silicone pads don't stay at their initial hardness through a production run. Repeated compression cycles cause the silicone to fatigue gradually, and the effective hardness at the working face of the pad decreases over time. 

Monitoring pad condition visually checking for surface tack loss, surface texture change, or visible deformation and establishing a pad replacement interval based on print quality data rather than just time in service is the practical way to manage this. 

Pad wear rate depends on compression pressure, cycle rate, and the geometry of the part surface.

How Ink Viscosity Interacts with Pad Hardness

Thicker inks need more deformation pressure from the pad to transfer cleanly which favours softer pads with more compliant contact. 

When you change ink formulation or viscosity switching suppliers, adjusting for a temperature change in the facility and checking whether the existing pad hardness is still appropriate is part of the process adjustment, not an optional step. 

Plastic coating services for automotive, consumer, and industrial components across plastic moulding companies in the region believe that the right hardness aligned with part geometry, ink, and wear conditions is essential for stable, repeatable results.

For manufacturers working with complex pad printing applications on plastic parts, Rustagi Polymers provides pad printing on plastic alongside vacuum metallizing on injection molded plastic components.

Frequently Asked Questions

  1. What does pad hardness mean in pad printing?

It's the Shore A hardness of the silicone pad, a measure of how much the pad deforms under compression. Softer pads deform more; harder pads less. The right hardness depends on the part geometry and the image being printed.

  1. How does pad hardness affect ink pickup and release?

Softer pads conform more closely to curved clichés for better pickup on contoured surfaces. Harder pads maintain form on flat surfaces for cleaner edge definition. Both extremes (too soft or too hard) cause quality problems.

  1. Which hardness works best for flat vs. contoured surfaces?

15–30 Shore A for flat or near-flat surfaces. 5–15 Shore A for contoured or domed parts where the pad needs to conform to the surface profile.

  1. How does pad hardness influence print edge definition?

Harder pads generally give sharper edges on flat surfaces because they don't deform as much during contact.

 Softer pads on contoured surfaces give better coverage but can slightly blur very fine edges if over-compressed.

  1. What happens if the pad is too soft or too hard?

Too soft: ink film distortion, detail blur, faster pad wear. 

Too hard: incomplete conformity to contoured surfaces, patchy transfer, incomplete ink pickup from curved clichés.

  1. How does pad wear affect hardness over time?

Repeated compression cycles cause the silicone to fatigue, reducing effective hardness at the working face. Pad replacement intervals should be based on print quality data, not just time in service.

  1. How does pad hardness interact with ink viscosity?

Thicker inks need more compliant contact i.e., softer pads. Thinner inks are more sensitive to over-compression from a too-soft pad. When ink formulation changes, verify pad hardness is still appropriate.

How Spray Painting Affects Thin Walls, Small Features, and Precision Components

Spray painting for plastic parts is one of those processes where the standard approach works acceptably for most applications and fails in critical precision applications. 

The cases where spray coating interacts badly with thin walls, small features, and precision components are more common than the industry tends to acknowledge.

This is a technical guide for engineers and quality managers working with precision injection molded plastic components where spray coating whether PU, acrylic, epoxy, or specialty chemistries is part of the manufacturing process.

The Core Problem: Coating Builds in Ways That Simple Specs Don't Capture

Spray coating builds non-uniformly on complex geometries. Edges and convex radii typically receive more coating than flat field areas because of the Faraday cage effect (when you apply an electrostatic charge to paint or powder, it’s attracted to the grounded part) in electrostatic systems, or simply because of overspray accumulation from multiple spray passes. 

For a component with a nominal wall thickness of 0.8mm and a coating target of 30 microns, a 60-micron buildup in a corner recess is a 7.5% dimensional change in that region. For most applications, that doesn't matter. For an assembly with 0.1mm clearance tolerances, it matters a great deal.

Understanding what injection molding tolerances engineers can realistically expect during manufacturing is essential context here — because the tolerance budget available for coating buildup is directly determined by what the molding process has already consumed

Adapting Spray Painting for Micro-Feature Geometries

Micro-features such as fine ribs, small pins, narrow slots, lettering, symbol recesses require a fundamentally different approach to spray parameter optimization than standard surfaces.

Key spray parameters for micro-features:

Multiple thin passes at lower pressure are almost always better than fewer thick passes at higher pressure for micro-feature coverage.

HVLP (High Volume Low Pressure) systems are preferred for micro-feature work because they minimize overspray and provide better transfer efficiency. 

Spray Pattern Control and Finish Accuracy

The spray pattern including fan width, uniformity, and edge definition is controlled by the air cap and fluid tip combination on the spray gun, the atomization air pressure, and the fan air pressure. 

For precision work, tighter fan patterns (50–100mm width vs. the 200–300mm fans used for large panel coating) provide better control over where coating lands and at what thickness.

Robotic spray application is worth considering seriously for precision components in volume production. For components where ±5 micron film thickness control is required across the part surface, manual spraying is hard to sustain at production volumes.

Electrostatic spray systems improve transfer efficiency (more of the atomized coating lands on the part vs. becoming overspray) and also produce more uniform coverage on complex geometries through the electrostatic wrap effect. 

However, they require parts to be electrically grounded, which means fixturing design matters, and they can cause excessive edge buildup on sharp features if not properly tuned.

Case Study: Connector Housing, Electronics Manufacturing

Challenge - A connector housing manufacturer needed a conformal PU coating on assembled connector bodies to provide moisture resistance without affecting the connector pin dimensional tolerances (±0.03mm required for mating). 

Solution: Manual spray produced film thickness variation of ±18 microns, which was causing occasional interference with the mating connector. 

Result: Switching to a robotic HVLP spray cell with optimized gun programming reduced film thickness variation to ±6 microns. No mating failures have been reported in 18 months of production.

Flow Rate and Atomization

Flow rate (the volume of liquid coating delivered per minute) and atomization air pressure interact to determine droplet size in the spray fan. 

Higher atomization pressure produces finer droplets which is generally desirable for precision work but also increases overspray and can cause turbulence that blows fine droplets away from small features before they deposit.

For thin-wall plastic components, there's an additional consideration: high atomization pressure with high flow rate can produce a localized pressure front at the part surface that deforms thin walls or displaces already-deposited wet coating. 

Critical Surface Preparation Steps for Precision Spray Painting

Contamination-free surfaces are non-negotiable for precision coating work, and the bar is higher than for standard parts because the thin film builds used in precision applications have less inherent hiding power for adhesion-compromising contamination.

For a detailed breakdown of what this preparation process involves and why each step matters, how surface preparation affects plastic coating adhesion and finish covers the full sequence from mold release removal through to pre-coat validation

Critical steps include 

Static charge elimination is particularly important for precision plastic components. 

Plastic parts accumulate static charge during molding, handling, and cleaning, and static charge attracts airborne contamination dust, fiber. 

Temperature and Humidity

PU coatings are moisture-reactive during cure. 

Temperature affects both the viscosity of the coating (which changes the spray characteristics) and the cure rate. 

At lower temperatures, viscosity increases and at higher temperatures, the coating pot life shortens and the risk of pre-cure in the spray gun increases.

Can PU Coatings Maintain Dimensional Stability After Curing?

PU coatings shrink slightly on cure typically 2–5% volumetric shrinkage depending on the specific formulation and cure conditions. 

Thermal cure of PU coatings involves heating the part, which can cause plastic substrates to warp or creep if the fixture doesn't support them adequately. 

Parts with thin sections (below 1mm) and long unsupported spans are at risk during oven cure at elevated temperatures. Post-cure dimensional stability is generally excellent for well-formulated PU coatings. 

Conclusion

Spray coating is not a purely cosmetic step rather a process that can alter tolerances. When you combine this with process variables like atomization, flow rate, spray pattern, humidity, and curing effects, even a thin coating can shift critical tolerances in high-precision assemblies. 

Moreover, edges and small features often get more coating, which can change tight dimensions and affect how parts fit together. That’s why careful control of the spray process is important for precision parts.

For manufacturers dealing with the specific challenges of coating precision injection molded components, Rustagi Polymers provides plastic painting services

Contacting an experienced manufacturer that also helps with metal plastic coating and injection mould services with process engineering support for precision and high-tolerance applications across automotive, consumer, and industrial sectors.

Frequently Asked Questions

  1. How is spray painting adapted for micro-feature geometries?

Fine atomization (HVLP), low flow rates, tight fan patterns, and multiple thin passes. Masking of critical dimensional features where buildup must be avoided. Robotic application for volume consistency.

  1. What role do low-build coatings play in precision applications?

They minimize dimensional change from coating while providing the required functional surface properties. 

  1. How does spray pattern control improve finish accuracy?

Tighter fan widths give better placement control. Consistent gun speed and distance (robotic) eliminate operator-variable film thickness. Electrostatic systems improve transfer efficiency and coverage uniformity.

  1. How are flow rate and atomization optimized for fine features?

Start with a minimum flow rate that achieves required DFT, then tune atomization pressure for droplet size and coverage uniformity. 

  1. What surface prep steps are critical for precision spray painting?

Cleanliness standards are higher for precision applications.

  1. How does humidity and temperature affect coating consistency?

High humidity causes PU cure defects (blushing, foaming). Low humidity extends open time and increases contamination risk. 

  1. Can PU coatings maintain dimensional stability after curing?

Yes, post-cure dimensional stability of PU coatings is excellent.  

Why Spray Painting Works Best on Tight-Tolerance and Micro-Feature Plastic Parts

Spray painting a flat plastic panel is straightforward. You set the gun, maintain a steady pass, and as long as the surface is clean, you get a consistent result. But the moment you're dealing with parts that have fine ribs, narrow slots, snap-fit hooks, or walls under a millimetre thick, you're in different territory.

For general plastic painting service work, this usually doesn't cause problems. For precision plastic parts from injection moulding services, it can break the assembly. Understanding how spray coating behaves on detailed geometry is what separates a coating vendor from a process partner.

Why Small Features Collect More Coating Than You Expect

When a spray gun passes over a raised rib or a thin wall, the atomised droplets don't just land on the top face. For a part going into a tight-tolerance assembly, say a clip that needs to engage a specific depth, or a pin that has to fit a precise hole; this becomes critical. 

This asymmetric film buildup is what causes most fitment and assembly failure. And because most coating inspection checks DFT on flat field areas, it often goes undetected until the part won't fit.

Key Challenges in Spray Coating Precision Plastic Parts

The Right Tools for Micro-Feature Spray Painting

HVLP spray guns such as High Volume Low Pressure are the standard for precision plastic painting service work. They atomise at lower exit velocity, which reduces turbulence around fine features. 

For high-volume production, robotic spray is worth considering. A robot follows the same path at the same speed and distance every cycle. That removes operator variation, which is the main reason manual spray produces inconsistent film build on complex parts. 

If your plastic injection moulding services produce tight-tolerance components and you need coating control to match, robotic spray is often the enabler.

Case Study — Connector Housing, Electronics Manufacturing

A connector housing needed PU coating for moisture resistance with pin tolerances held to ±0.03mm. 

Manual spray was giving ±18 micron film thickness variation which is enough to occasionally block mating. 

Switching to a robotic HVLP cell brought variation down to ±6 micrometers. No mating failures reported in over 18 months of production.

How Low-Build Coatings Work

Not every precision application needs a standard 25–40 micron coating. For parts where dimensional change from coating has to be minimal, low-build coatings targeting 8–20 microns DFT are the right starting point. 

They provide the required surface properties such as the following: 

The trade-off is that the application window is narrower. You have less room between too thin and too thick. Process parameters need to be dialled in more carefully, and environmental control in the spray booth matters more.

Flow Rate, Atomisation, and Achieving Balance 

Flow rate and atomisation pressure work together. Higher atomisation pressure produces finer droplets, which is generally what you want for detailed features. 

But push it too far and you get excessive overspray and turbulence that bounces droplets off fine geometry rather than depositing them. 

On very thin walls (under 0.5mm) aggressive atomisation can even cause slight deflection of the wall during wet film deposition.

Surface Preparation 

Surface preparation is the most common cause of adhesion failures in plastic painting service applications. 

Key requirements include:

Most standard releases are silicone-based, and silicone contamination prevents base coat from sticking reliably. Much like how to use primer coats for getting high-quality vacuum metalizing, establishing a flawless chemical bond starts with total contaminant removal. If you're seeing contamination specs that appear from nowhere, static is usually the reason.If you're seeing contamination specs that appear from nowhere, static is usually the reason.

Temperature and Humidity 

PU coatings cure through a moisture-reactive mechanism. Too much humidity and you get surface blushing, haziness, micro-bubbles. 

Too little and the cure slows enough that contamination has time to settle on the wet film. 

Temperature affects viscosity within cold conditions thicken solvent-borne coatings and change how they spray. Hot conditions shorten pot life.

Does PU Coating Stay Dimensionally Stable After Curing?

Yes, cured PU coatings are chemically cross-linked and dimensionally stable. This chemical resilience is exactly why PU coating is the secret to long-lasting plastic surfaces, provided the substrate itself doesn't warp. They don't creep under ambient conditions. The risk is not the coating but it's the substrate. 

Thin-wall plastic parts can warp in a thermal cure oven if they're not properly fixtured. UV-curable PU formulations cure at near-ambient temperature and eliminate this risk for compatible substrates.

Final Takaway

For precision plastic components where coating quality and dimensional control both have to be right, Rustagi Polymers takes care of plastic painting services and PU coating. 

We also support spray painting solutions with the process engineering depth needed for tight-tolerance injection moulded parts.

Frequently Asked Questions

  1. How is spray painting adapted for micro-feature geometries?

Spray painting for tiny or detailed parts is adjusted like this:

  1. What role do low-build coatings play in precision applications?

They achieve the required surface properties at 8–20 micron DFT, minimising dimensional impact on tight-tolerance features. They require tighter process control than standard coatings.

  1. How does spray pattern control improve finish accuracy?

Narrower fans give better placement control. Consistent speed and distance, most reliably achieved by robotic spray eliminate the film thickness variation that causes dimensional problems.

  1. How are flow rate and atomisation optimised for fine features?

Start with minimum flow rate for the required DFT, then tune atomisation for droplet size and uniformity. Roughly 80–150 cc/min fluid delivery, 1.5–2.5 bar atomisation for HVLP PU work.

  1. What surface prep steps are critical for precision spray painting?

Thin film builds don't hide contamination the way thicker decorative coats might.

  1. How does humidity and temperature affect coating consistency?

High humidity causes PU surface defects. Low humidity slows cure and increases contamination risk. Temperature shifts viscosity and pot life. A controlled environment at 21 ± 2°C and 50 ± 10% RH is the production standard.

  1. Can PU coatings maintain dimensional stability after curing?

Yes. The coating itself is stable. The risk is substrate warping during thermal cure managed through fixturing or UV-cure formulations for thin-wall parts.

POST AN ENQUIRY